Upstream Proxy (MBBridge)
What Is an Upstream Proxy and Why Do You Need One?
A common scenario when using Mbbrowser Fingerprint Browser for overseas business: you've purchased a batch of overseas proxy IPs, entered them into Mbbrowser's environment configuration, but the connectivity check keeps failing — because your local network can't directly reach the overseas proxy servers.
The traditional workaround was to install third-party tools like Proxifier, manually binding Mbbrowser's processes (mbbrowser.exe, chrome.exe, etc.) to your existing VPN exit — a tedious setup that requires manual reconnection if the tunnel drops.
Starting with this version, Mbbrowser includes MBBridge (Upstream Proxy Bridge), completely replacing the need for Proxifier:
- 🖱 One-click setup: Enter your proxy address → click "Start Bridge" → all Mbbrowser environments instantly route through the proxy;
- 🔒 Process-level isolation: Only Mbbrowser-related process traffic is intercepted; all other programs on your computer are completely unaffected;
- 🔄 Auto-recovery: If MBBridge crashes, the Mbbrowser main program automatically restarts it, ensuring business continuity.
Where Is the Settings Interface?
Open the Mbbrowser Fingerprint Browser main window, click the "Settings" icon in the bottom navigation bar → select "Upstream Proxy" from the left menu. You will see the following configuration panel:
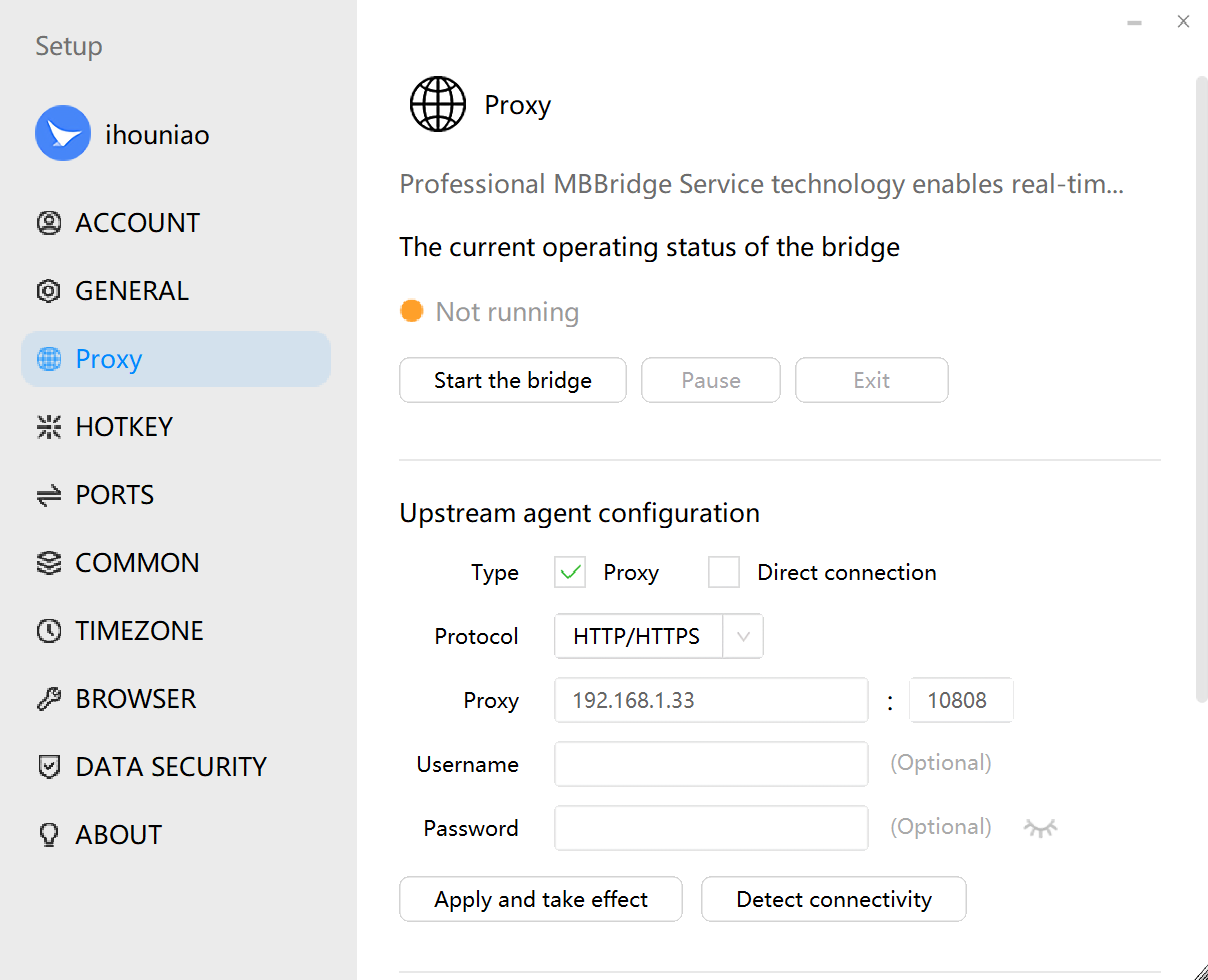
The image above shows the complete MBBridge configuration panel. Each section is explained in detail below.
Step-by-Step Configuration
Step 1: Enter Your Upstream Proxy Information
In the "Upstream Proxy Configuration" section at the top, fill in the following fields:
| Field | Description | Example |
|---|---|---|
| Protocol | The protocol your proxy server uses | SOCKS5 or HTTP/HTTPS |
| Proxy Address | The IP address or domain name of your proxy server | 192.168.1.33 |
| Port | The port number of your proxy server | 10808 |
| Username | If your proxy requires authentication, enter the username; leave blank for IP whitelist authentication | user123 |
| Password | If your proxy requires authentication, enter the password; leave blank for IP whitelist authentication | pass456 |
💡 Where do I find these details? Get this information from your local upstream proxy software (e.g., v2ray, Clash, etc.). If your proxy software already has TUN mode enabled, you can skip MBBridge configuration entirely. If TUN is not enabled, your proxy software will provide a local
IP:PORT(e.g.,127.0.0.1:10808) — enter that address here.⚠️ Important: Do NOT enter the commercial proxy IPs purchased from your proxy provider in this MBBridge configuration window. The upstream proxy is a separate step required to get onto the international internet — it serves a different purpose from your business proxy IPs.
Step 2: Choose Your Outbound Mode
In the "Network Outbound Mode" section, choose based on your network environment:
| Mode | When to Use | How It Works |
|---|---|---|
| Proxy Mode (Recommended) | Using purchased commercial proxy IPs | All Mbbrowser browser environment traffic is forwarded through MBBridge to your configured upstream proxy server |
| Direct Mode | System-wide VPN already installed (e.g., V2Ray, Clash) | Mbbrowser traffic routes directly through the OS VPN tunnel — no separate proxy address needed |
When should you use Direct Mode? If your computer or server already has a global VPN running (your entire system's network has entered the international internet), switch to "Direct Mode". Mbbrowser will automatically route through the system VPN tunnel without needing a separate proxy address.
Step 3: Apply the Configuration
After entering your proxy information and selecting the mode, click "Apply & Activate":
- The system immediately writes your proxy configuration into the MBBridge engine;
- To verify the proxy works before starting, click "Test Connectivity" — the result will be shown in real time on the interface.
Step 4: Start the Bridge
Click the "Start Bridge" button:
- The status indicator at the top of the panel changes from 🟠 Orange (Not Running) to 🟢 Green (Running);
- MBBridge has now successfully taken over the network traffic for all Mbbrowser browser environments;
- From this point on, every browser environment you open in Mbbrowser will automatically access the internet through your configured upstream proxy — no further action needed.
Control Button Reference
| Button | Function |
|---|---|
| Start Bridge | Enables proxy takeover — Mbbrowser environment traffic will route through the proxy |
| Pause | Temporarily pauses proxy takeover (background process is kept alive) — useful when you briefly need direct access; click "Resume" to restore at any time |
| Exit | Completely shuts down the MBBridge background process, fully stopping proxy takeover |
| Apply & Activate | Saves the currently entered proxy configuration and applies it immediately (use this when changing proxy details) |
| Test Connectivity | Tests whether the currently entered proxy can connect successfully — results are displayed in real time |
Frequently Asked Questions
❓ I've started the bridge, but the proxy IP check in my environment still fails. Why?
The bridge handles "routing Mbbrowser's traffic through the upstream proxy to exit to the internet." However, the proxy IP in the environment configuration must still be filled in separately — they serve different purposes:
- MBBridge Upstream Proxy = Your VPN/exit proxy (gets Mbbrowser onto the international internet)
- Environment Config Proxy IP = Your business-specific proxy IP (makes the target website see a specific regional IP)
The correct network topology is:
Mbbrowser Process → MBBridge (upstream proxy exit) → International Internet → Environment Proxy IP Server → Target Website❓ Will enabling MBBridge affect other programs on my computer (like Telegram, browsers, etc.)?
No. MBBridge uses precise process-level traffic interception, only capturing traffic from Mbbrowser-related processes (mbbrowser.exe, chrome.exe, cdp.exe, etc.). All other programs are completely unaffected.
❓ After closing Mbbrowser, do I need to manually restart the bridge next time?
Yes. To ensure your network works properly, after launching Mbbrowser you will need to open the settings panel again and manually start the bridge.
❓ Can I change the proxy address while the bridge is running?
Yes. Simply modify the proxy information in the configuration panel and click "Apply & Activate". The new settings take effect immediately, without restarting the bridge.
Using an SSH Server as Upstream Proxy
Mbbrowser also supports SSH protocol to use your VPS or Linux server as a proxy exit. The built-in mblink.exe tool handles this natively — no need to install PuTTY or XShell.
When creating or editing a browser environment, select SSH as the proxy protocol, then enter:
- Server address (IP or domain)
- Port (default: 22)
- Username + Password (or private key file path)
Mbbrowser will automatically invoke mblink.exe in the background to establish an SSH tunnel and take over that environment's traffic.
📌 Summary: MBBridge frees Mbbrowser from dependency on third-party tools like Proxifier. Simply enter your upstream proxy details, choose your mode, and click Start — all Mbbrowser browser environments will seamlessly route through the proxy. One-click, done.