# Proxifier usage instructions
Proxy detection error code table
# Previous
Due to the objective factors that some customers' local network access to overseas Internet is blocked, when you purchase and use the overseas proxy IP of the IP platform provider, there is a certain chance that you cannot connect successfully by directly entering the overseas proxy IP in the environment configuration of the migratory bird client. Therefore, you need to first place the local network into overseas, enter the international Internet, and use the Proxifier tool for high-speed traffic forwarding before you can successfully use the purchased overseas proxy IP.
# Network Topology:

My PC -> Local Network (domestic internet) -> v2..y (or other VPN software successfully crossing borders) -> International Internet (the local network has entered the international internet) -> Proxifier (the v2..y proxy has been configured and bound with the Migratory Bird client/Migratory Bird browser kernel) -> Migratory Bird Client -> Fill in the overseas proxy IP in the environment configuration (The proxy IP has been successfully detected) -> Carry out cross-border e-commerce business (At this time, the target website sees that overseas users are accessing)
# Usage Scenario:
Scenario 1: In the local domestic network environment, if you directly use an overseas proxy IP and it fails, you need to use this method to ensure that the overseas proxy IP can be used normally for commercial purposes.
Scenario 2: The local network has been integrated into the Internet, but international Internet business access and development require the use of HTTP/SOCKE5 to fill in the local IP:PORT method. The error message is: If using an overseas proxy IP in a migratory bird fails, you need to use this method to ensure that the overseas proxy IP and browser environment can access overseas sites for normal commercial use.
Scenario 3: In a local network environment where multiple levels of proxies have been enabled, and each proxy server is nested within another, using the migratory bird detection method to detect the failure of overseas proxy IPs requires you to use this method to ensure that the overseas proxy IPs can be used normally.
# The diagram illustrating the activation of the proxy IP after Proxifier is running:
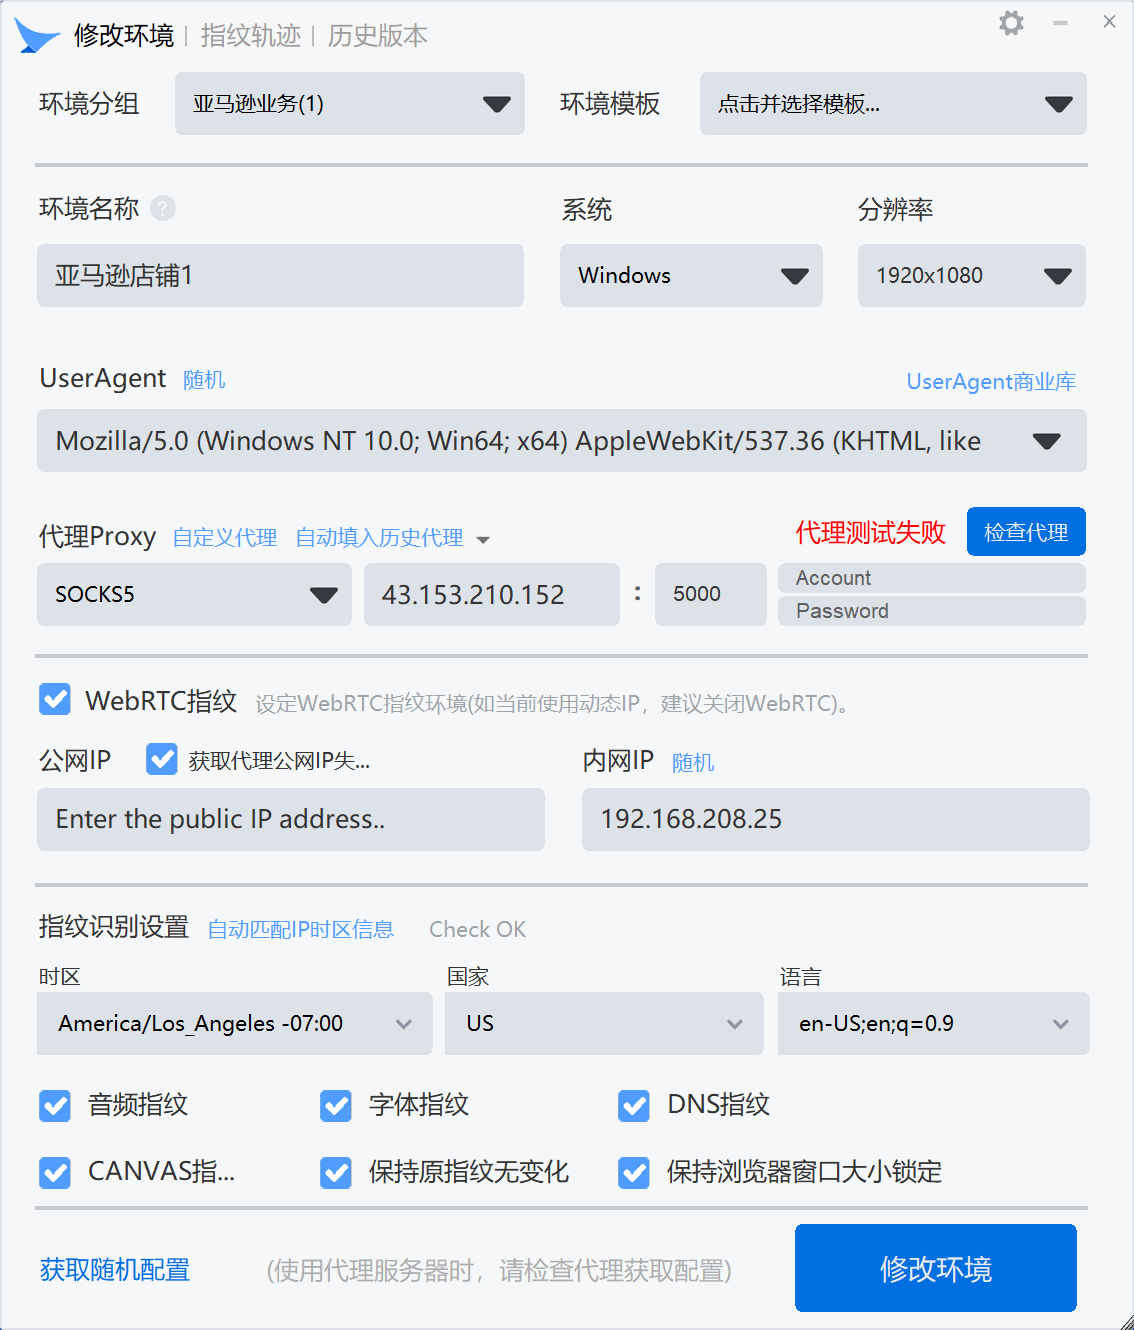
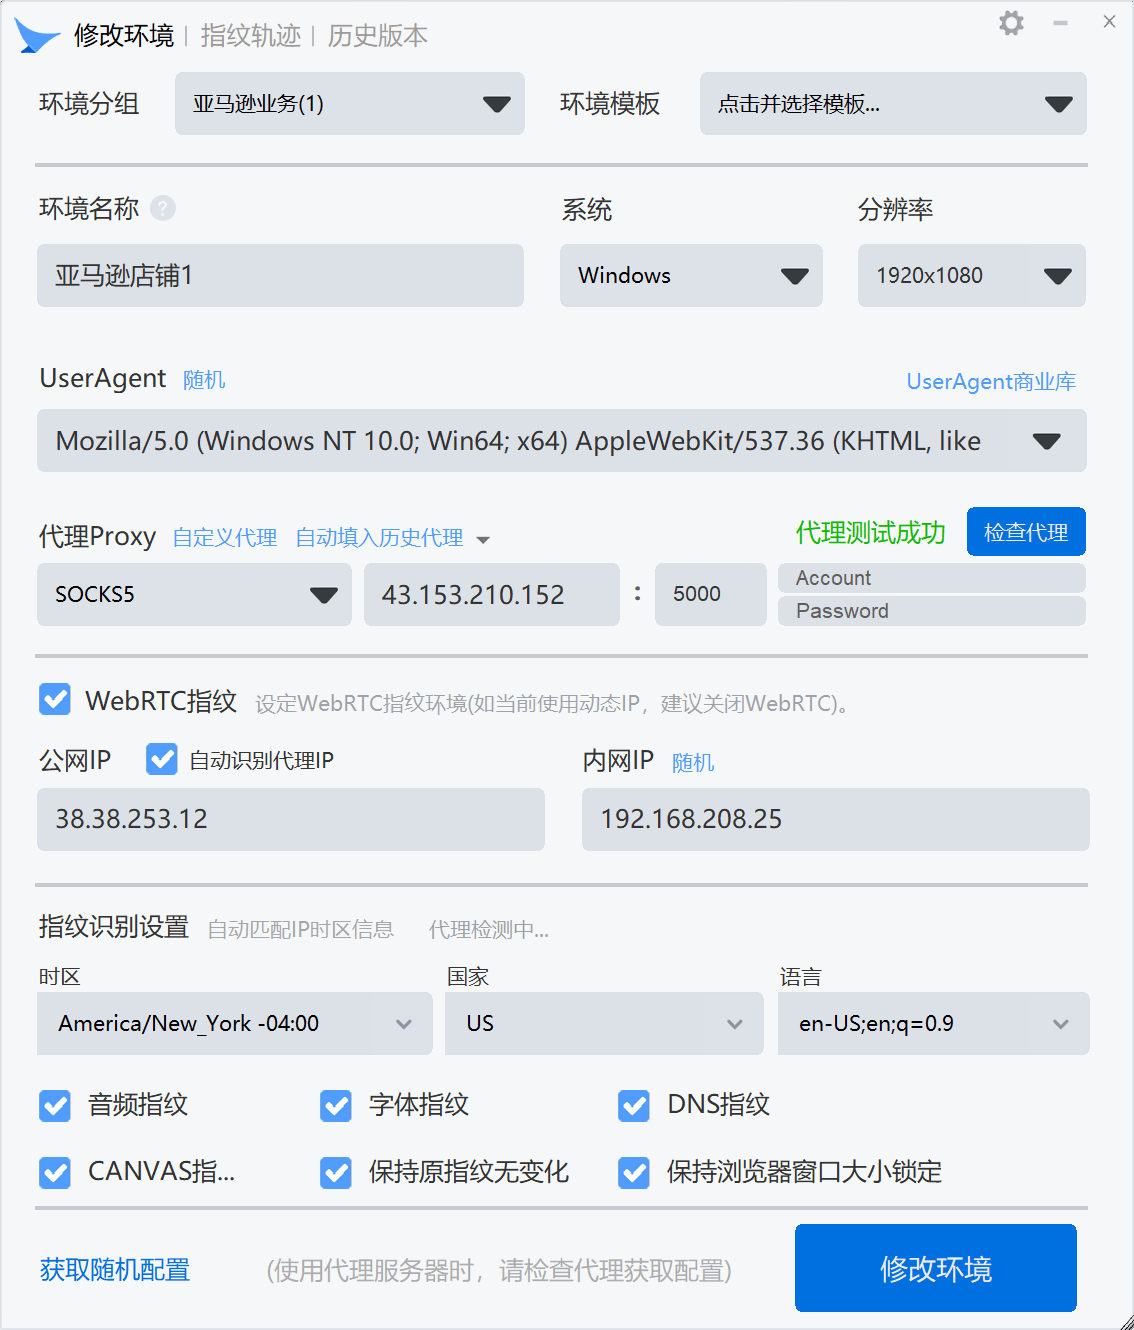
In the Migratory Bird Client, go to the Environment Configuration panel, run and configure Proxifier, fill in your overseas proxy IP, and check that the overseas proxy IP is successful, as shown in the figure:
Under multi-level proxy, when Proxifier is not enabled, the migratory bird environment detection proxy:
Under multi-level proxy, Proxifier has been enabled:
# I. Proxifier Download
Download address (click to download the original Proxifier installation package): [Mbbrowser_Officially_Designated_Bridge_Software_ProxifierSetup.exe](https://www.mbbrowser.com/down/tools/%5bBridge Tool_Original %5dBridge_Software_ProxifierSetup.exe "Mbbrowser_Officially_Designated_Bridge_Software_ProxifierSetup.exe")
# II. Proxifier Installation
Run the installation package and select the default settings for all installation processes until the installation is complete.

After installation, you can see such files.
- Proxifier Service Manager: Run Proxifier as a system service. If you need Proxifier to start automatically after system startup, you can use this tool to set Proxifier to run as a system service.
- Proxifier: Main Program
- Proxy Checker: A tool for detecting the functionality of upstream proxy servers, such as v2..y/vpn, and is highly useful.
- Uninstall Proxifier: Proxifier uninstaller.
# III. Run and configure Proxifier
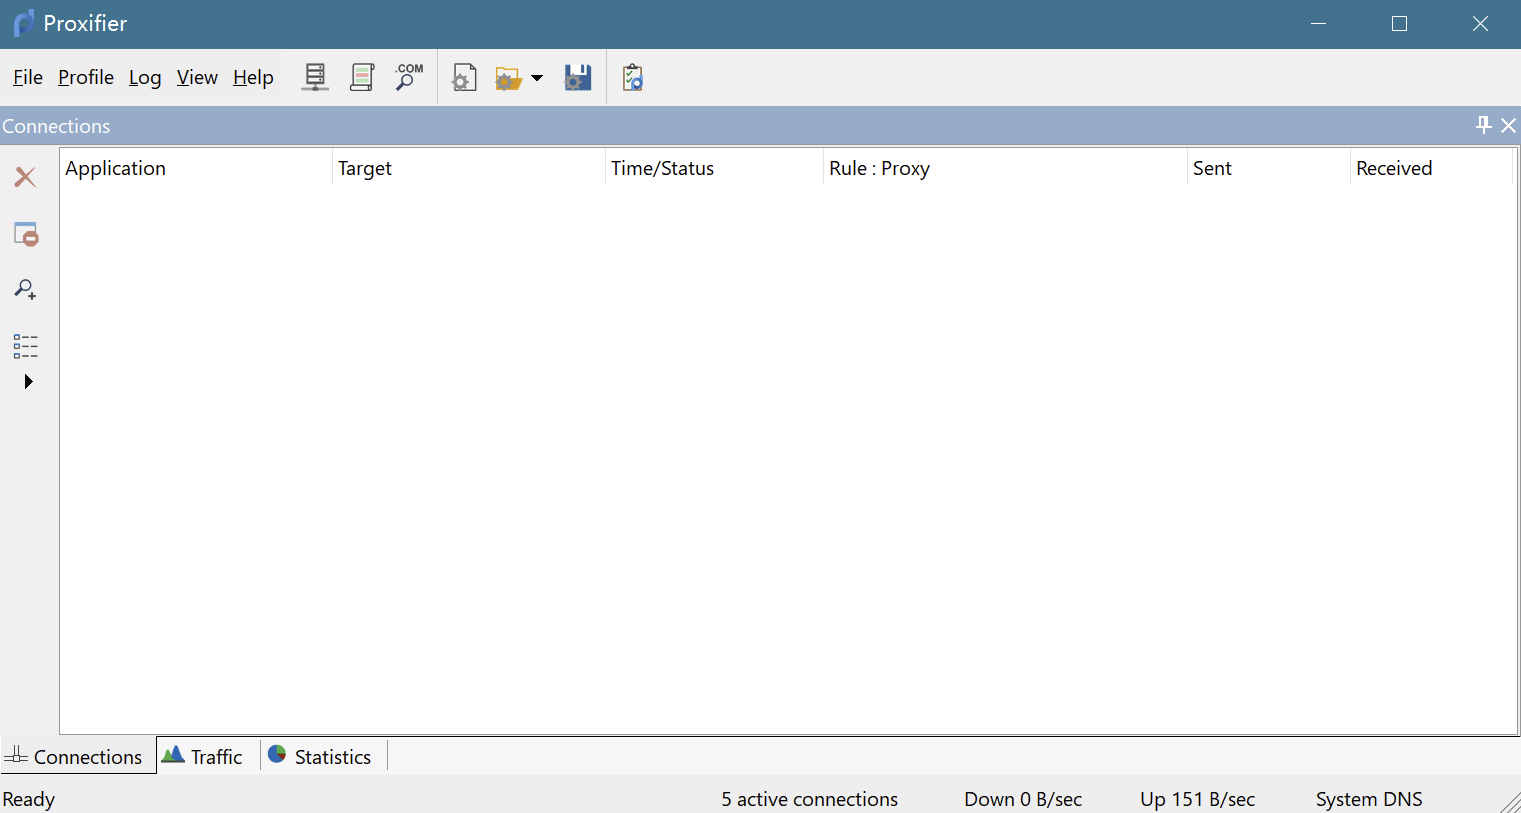
After the installation is complete and Proxifier is running, you can see this default interface, indicating that the bridge software has started running normally. Now start configuring the software.
Click the 1 arrow pointing button to pop up the Proxy Servers window. Click the 2 arrow pointing to the button Add..., and a window will pop up to add the IP+port of the upper-level proxy server
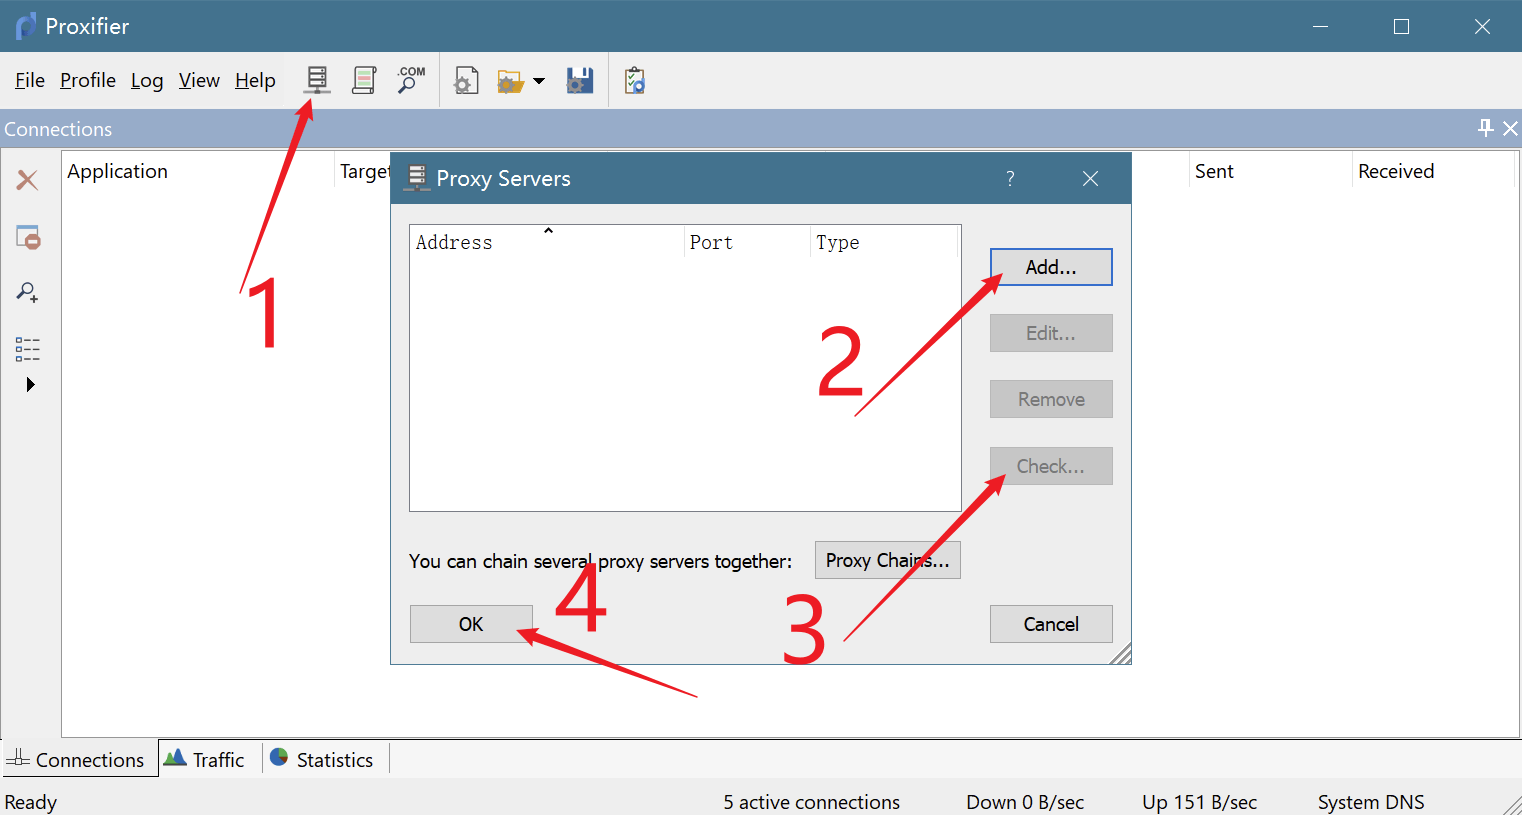
Arrow 3: It is used to detect whether the superior proxy tool is running normally after you add the proxy IP and proxy port.
Arrow 4: After the superior agent tool passes the detection, click OK to save.
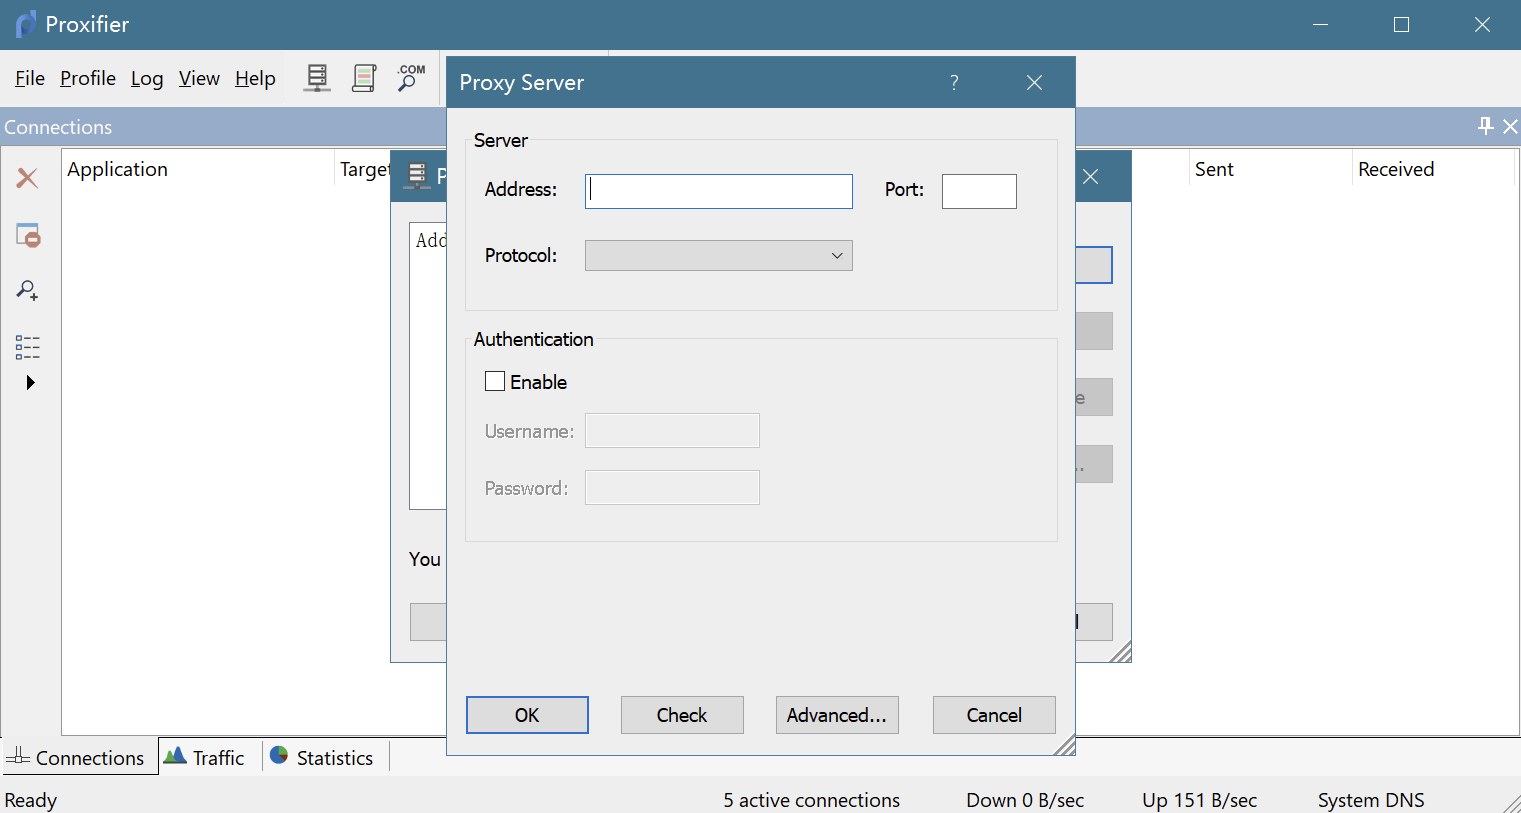
Add the IP and port of the upstream proxy tool to forward traffic.
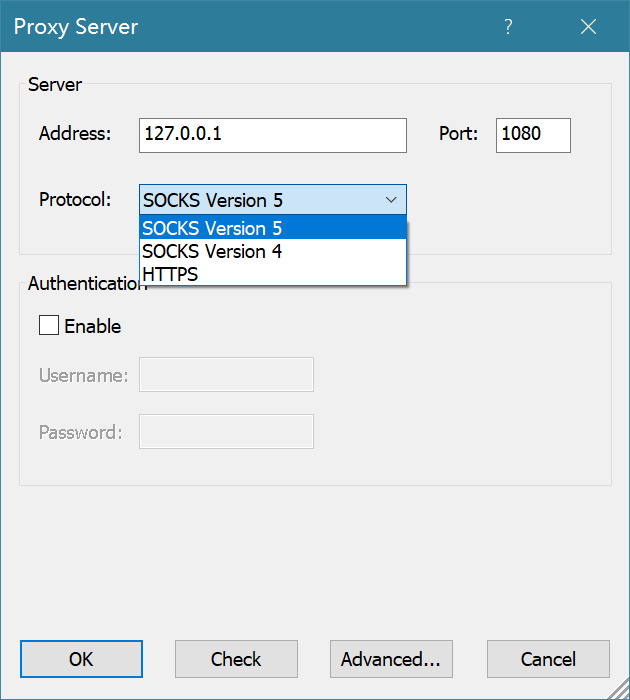
Fill in the IP, port, and proxy protocol of the superior proxy here.Click OK to save.
For example, if your superior proxy tool is v2..y, the data forwarding proxy IP and port of v2..y are shown in the following figure:
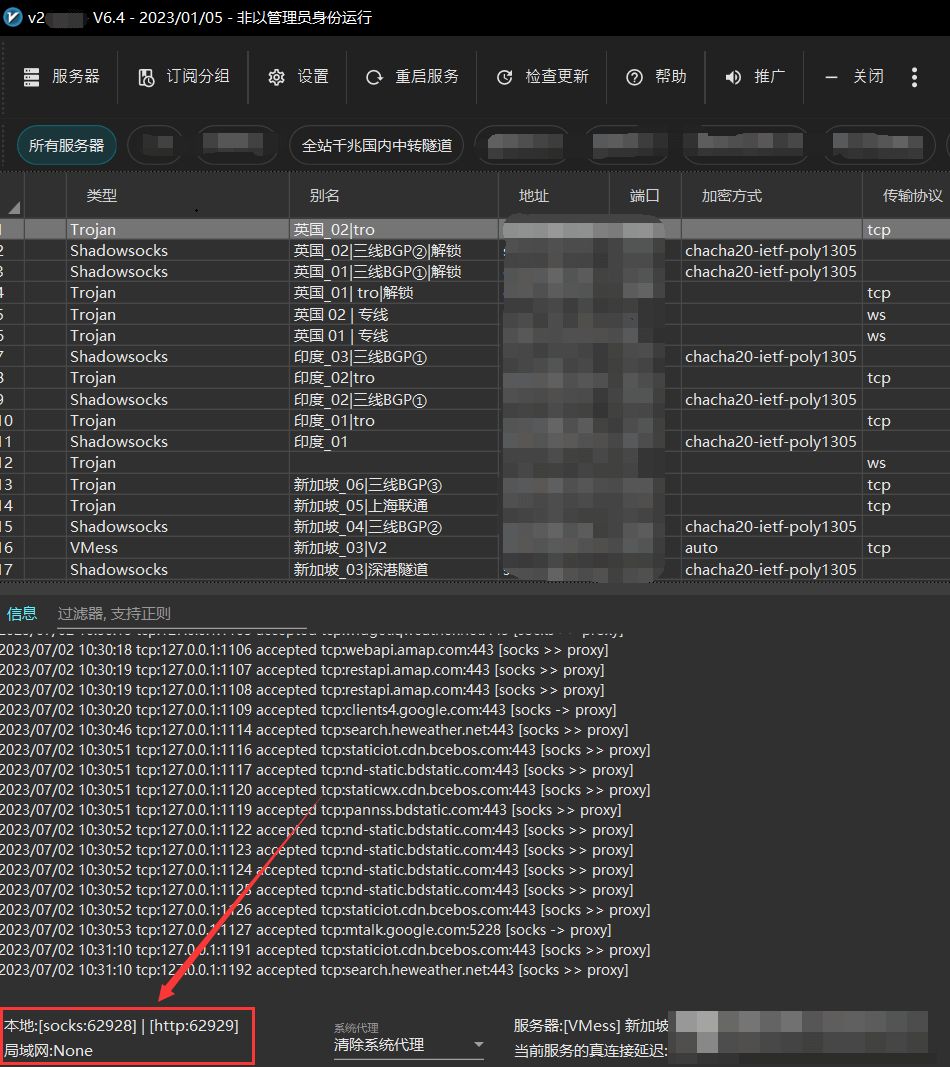
Note: If v2..y is running on another machine in your local network, you need to fill in the intranet IP of that machine and the port in the image above.If v2..y and Proxifier are running on the same machine, write 127.0.0.1 for IP.
# Proxifier rule addition
Add the Migratory Bird Client and Migratory Bird Kernel to Proxifier
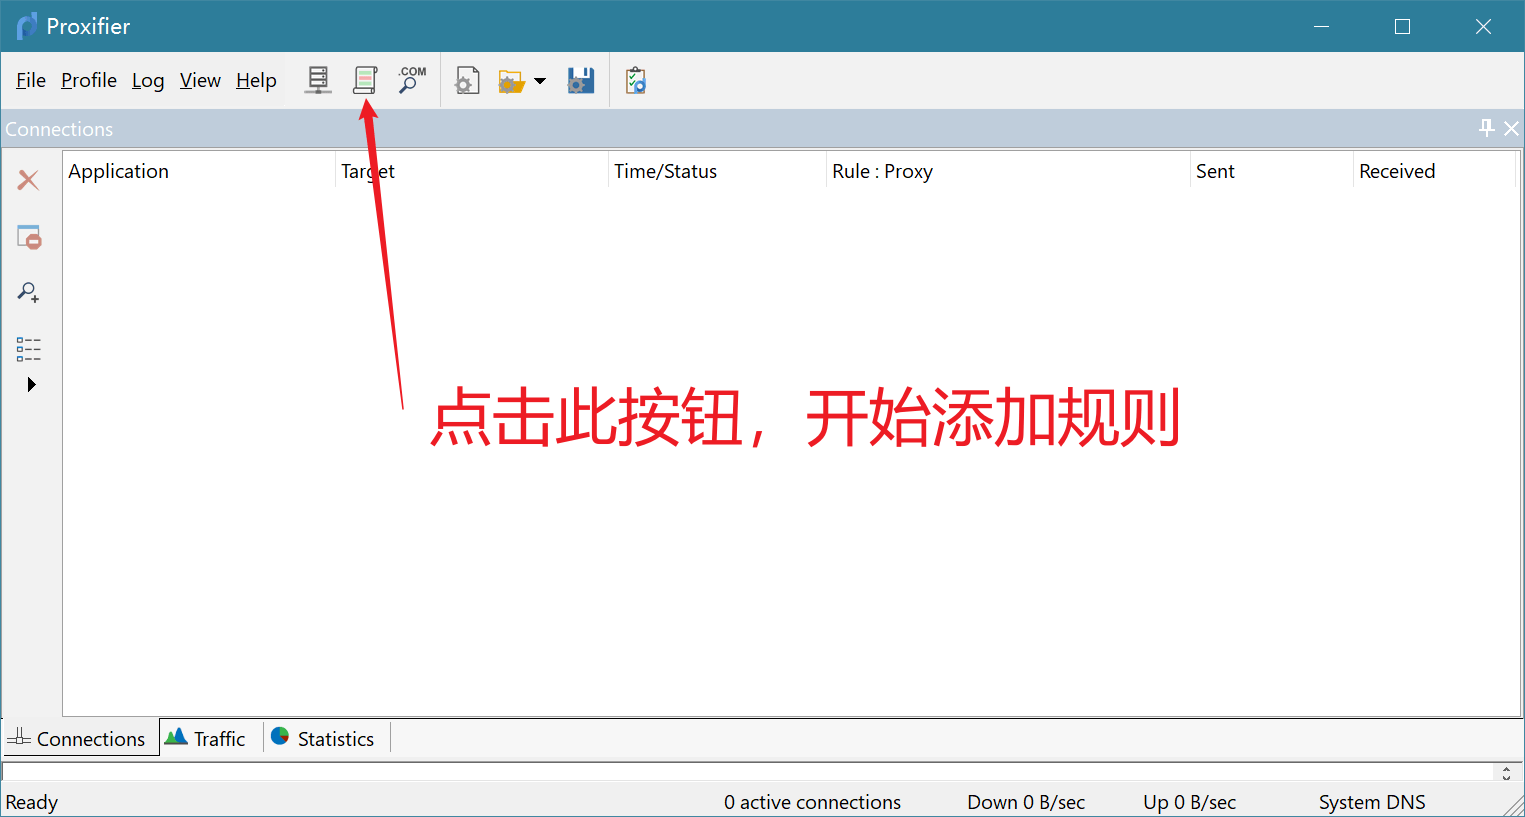
- Click the button in the above figure to pop up the rule setting window.Add the executable file of migratory birds to the rules.In this way, the traffic of the proxy can be directly sent to the migratory bird client and migratory bird kernel.
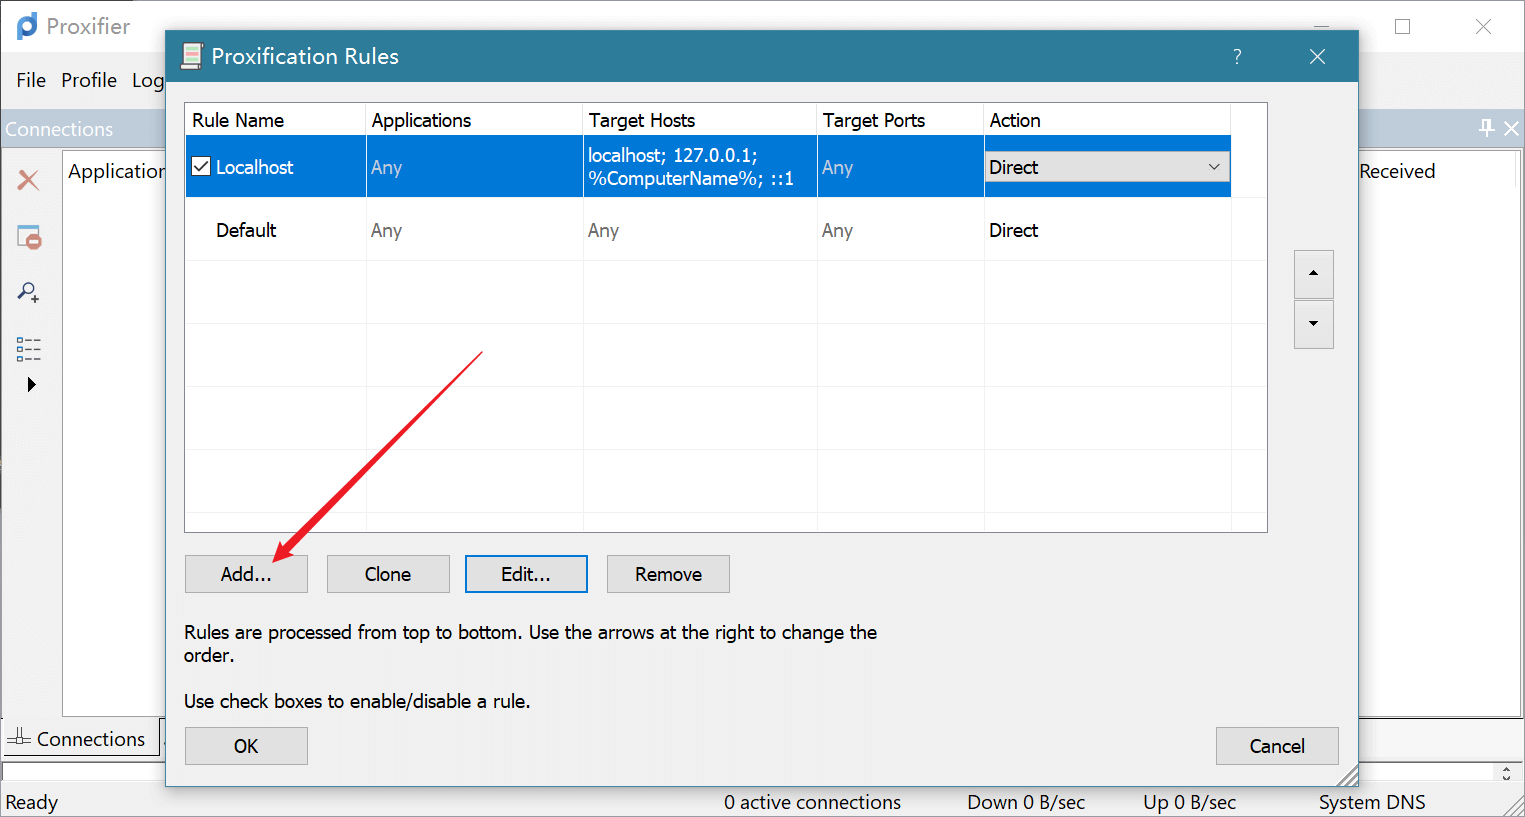
- Click the ADD button to add the executable file of migratory birds to Proxifier, also known as adding rules.
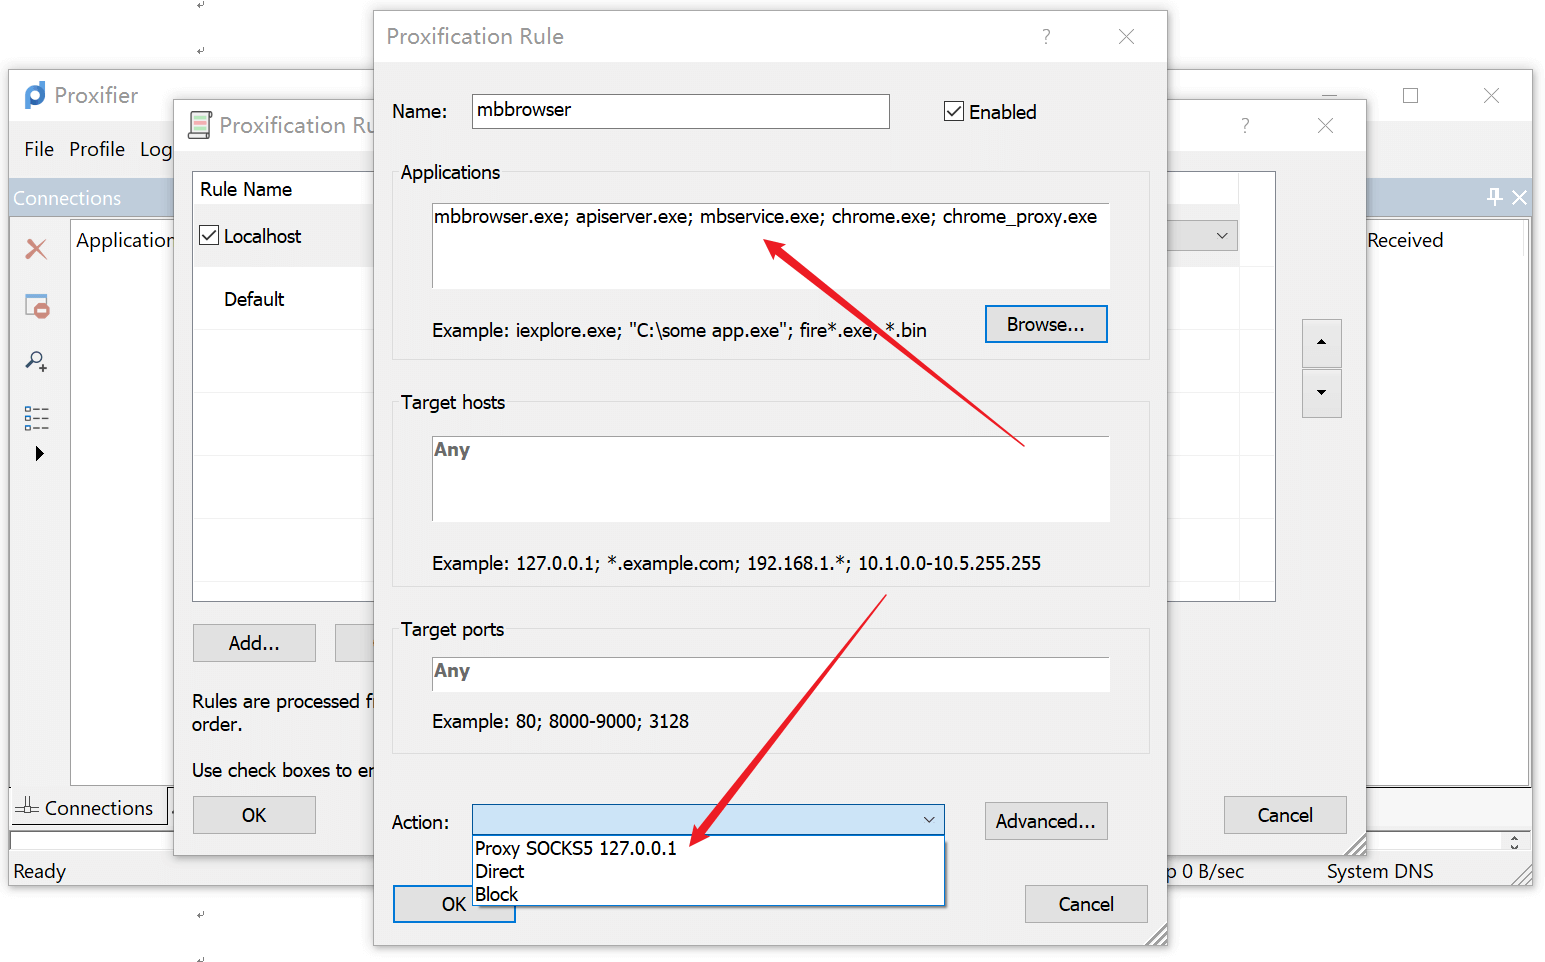
See the figure above. First, fill in the rule name in the Name field.
Click the Browser button to open the mbbrowser.exe in the locally installed Migratory Bird Clientapiserver.exe, mbservice.exeAdd chrome.exe and chrome_proxy.exe in the subdirectory MBbrowser to the box in the figure above.
In the Action: drop-down list in the above figure, select Proxy Socks5 127.0.0.1. Note that the address here is the proxy IP: port address of the upper-level proxy tool. Be sure to choose the correct one.
Click OK to save.
# Proxifier + MBBROWSER joint test
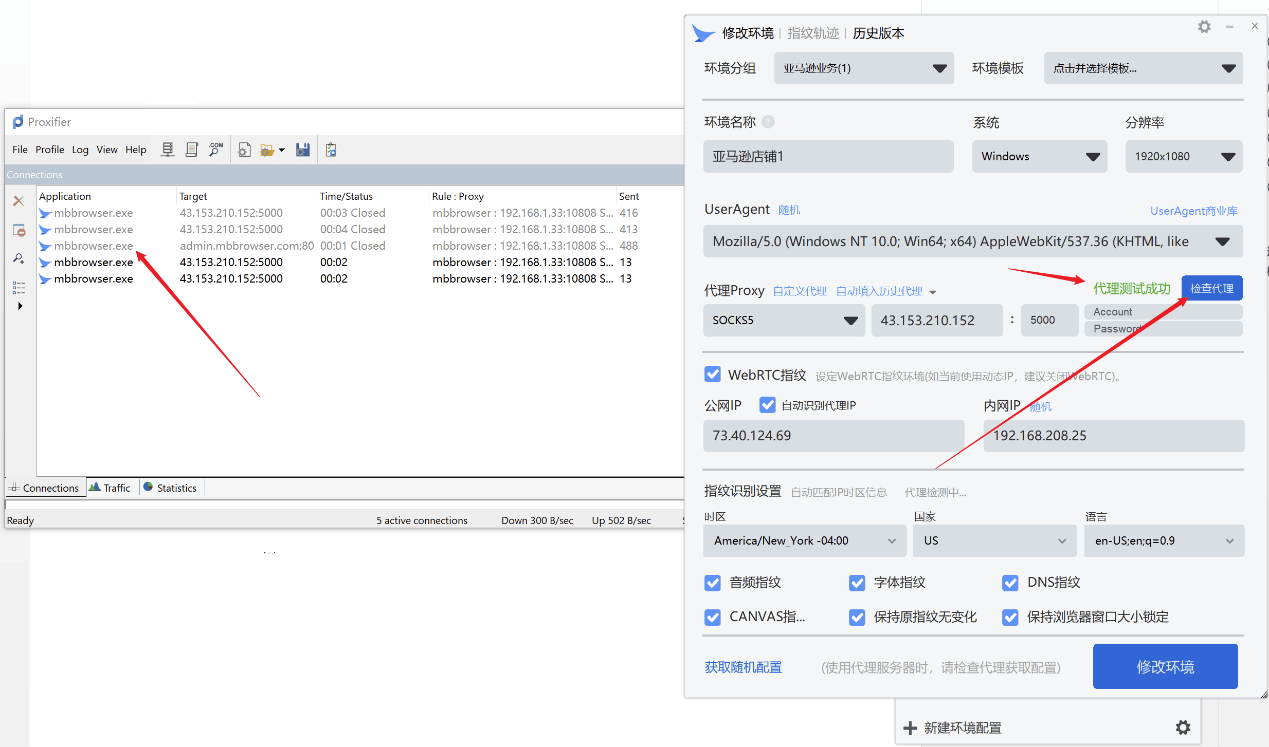
After configuring the rules for Proxifier, you can now enter the Migratory Bird client and access the environment configuration panel to start testing your purchased proxy IP. At this point, the proxy IP can successfully connect.At the same time, you can see in Proxifier that there is already traffic going to the migratory bird client.
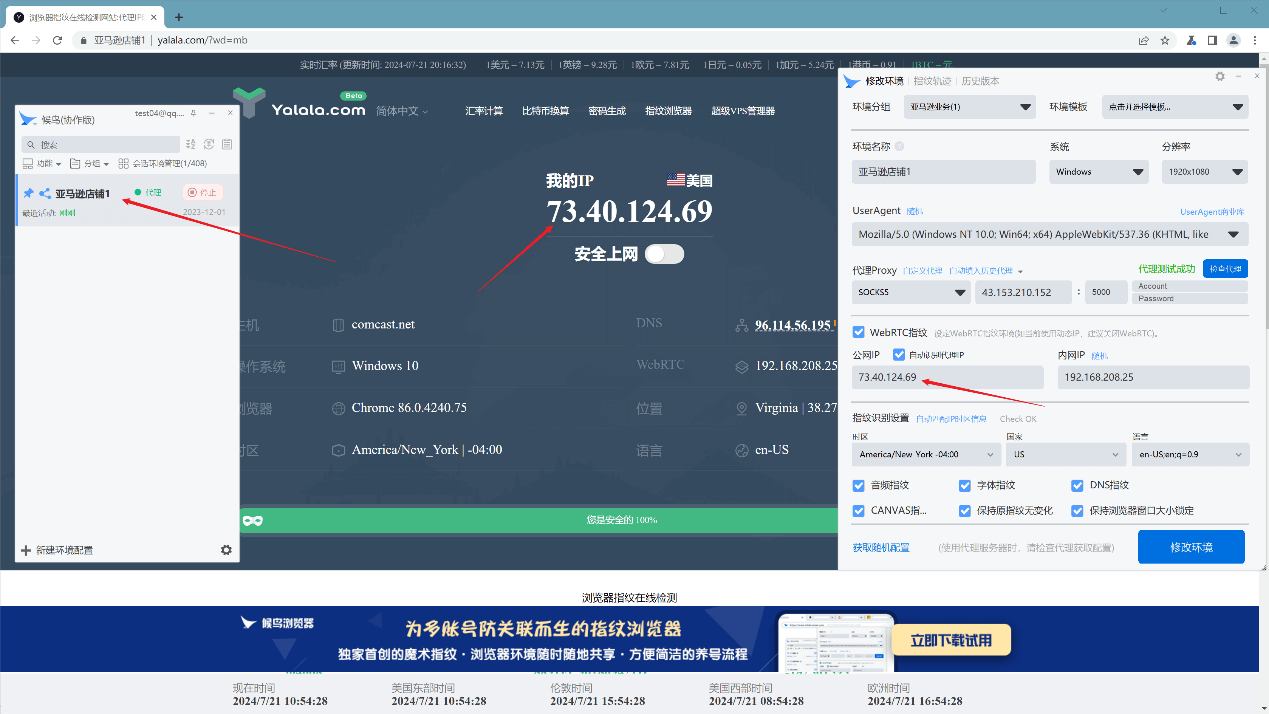
At this time, after you run the environment, in YALALAIn COM, you can see that the proxy IP and environment are running normally.
If you are accustomed to using the Chinese version, you can download the online Chinese version, as shown in the figure:
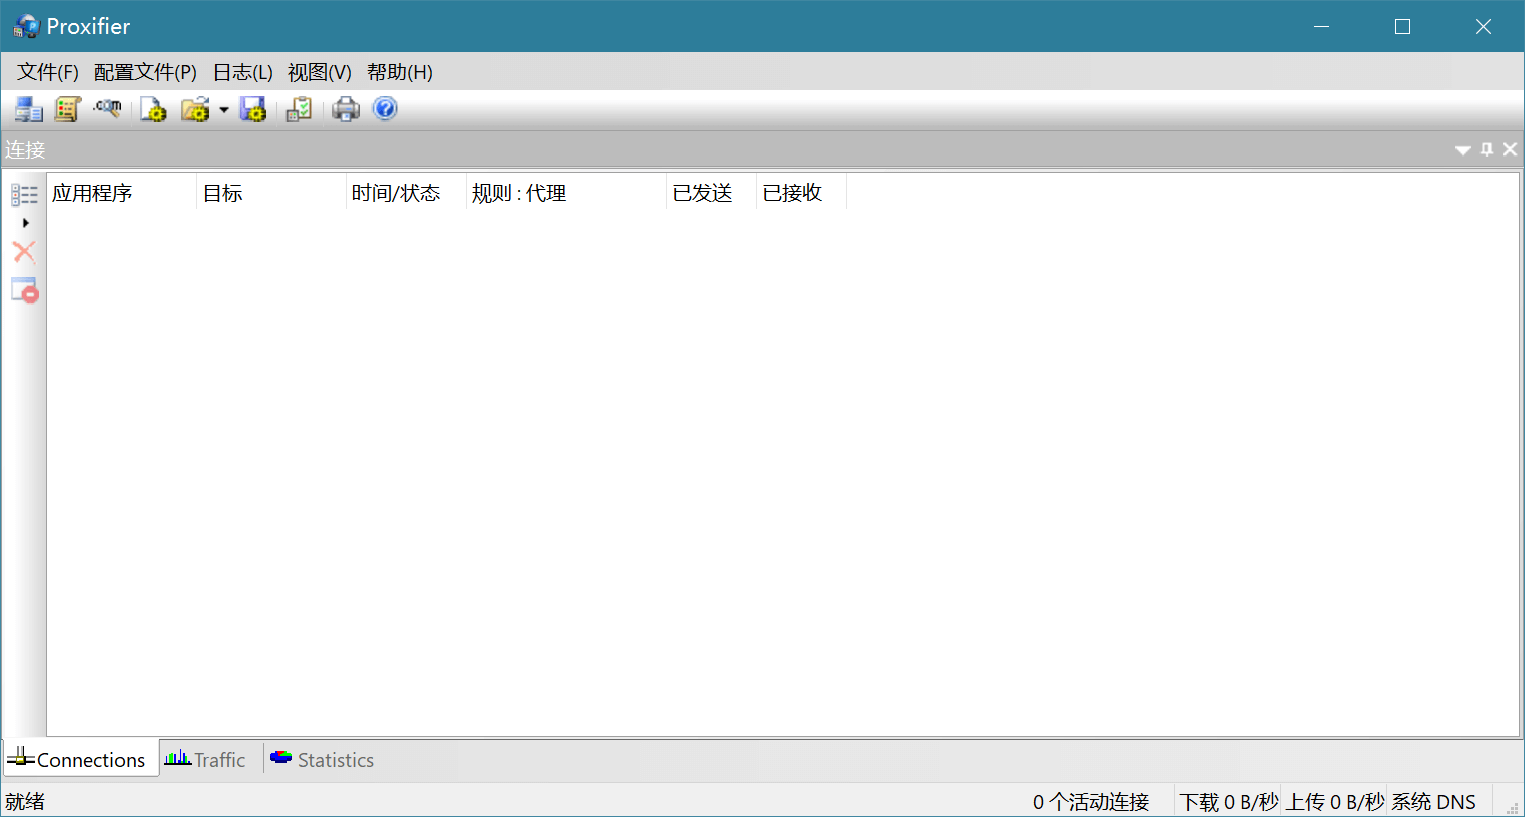
Chinese version download address: [click to download](https://www.mbbrowser.com/down/tools/%5bBridge tool_Chinese version %5dBridge_Software_ProxifierSetup.exe "click to download")
Other Proxifier-related tutorials: https://blog.csdn.net/shengbo7/article/details/145241411 (opens new window)
